


In my year-long video journal challenge I’ve embraced modern video standards and switched to shooting everything in HDR. After a lot of trial and error, here is my complete HLG HDR DaVinci Resolve workflow that I use to create my YouTube videos.
I’m doing a year-long Daily Clip Challenge where I record at least one short video clip every day. At the end of each month I compile the clips into a “month in the life” video that I post on YouTube. I’ve kept written journals in the past, but this year I’ve chosen video to capture ordinary moments, daily routines, snapshots of life as a professional psychic entertainer, cultural explorer, full-time traveler and photographer. I love what the process is teaching me and that I am saving memories of a very memorable year.
One of my first big decisions in figuring out how to create these videos was to decide in which format I wanted to shoot my videos, traditional SDR (Standard Dynamic Range) or modern HDR (High Dynamic Range). I am aiming to create the highest quality video possible. Initially thought that newer HDR video looked much too 'video' compared to the 'cinematic' SDR video I was used to. However I soon began to appreciate the hyper-realistic look of HDR for recording daily vlogs and began figuring out a HDR workflow for footage shot on my Pixel 8 phone and Osmo Pocket 3 cameras.
I have learned to fully embrace modern video standards. For decades, video standards were built around the limits of cathode-ray tube (CRT) televisions. Those early displays could only produce about 100 nits of brightness and a narrow range of colors, roughly 35 % of the visible spectrum. The entire SDR system from cameras to broadcast signals was designed to fit within those constraints.
Modern HDR displays, by contrast, can reach 600 to 2000 nits or more and reproduce over a billion colors, thanks to 10-bit color depth and the Rec. 2020 color gamut. This expanded range allows HDR video to show both brilliant highlights and deep shadows at once, with rich, accurate midtones in between. When viewed on an HDR-capable screen, the result appears visually true-to-life. Bright reflections look bright, dark areas reveal subtle texture, and colors appear more dimensional. HDR mimics how our eyes perceive light in the real world.
Another huge factor in deciding to shoot in HDR is that it is more future-proof. As more platforms and devices adopt HDR as the default standard, mastering your projects in HDR ensures your videos will continue to look their best for years to come even as display technology evolves.
I decided to shoot all of my blog videos in HDR meaning my cameras (my Pixel 8 Pro phone, the Osmo Pocket 3, and occasionally my Sony A7C II) are set to record HDR footage using the HLG (Hybrid Log-Gamma) standard. HLG is a broadcast-friendly HDR format designed to work gracefully on both modern HDR and traditional SDR displays, and is supported by YouTube alongside PQ-based HDR workflows. By using HLG my workflow serves both HDR and SDR viewers.
Here is an example of the result. If you have an HDR capable screen (like most smartphones have) you will notice the vivid colors. If you are using a SDR screen it should look great, like any other video:
My HDR Workflow
After extensive testing and tweaking, here’s the full workflow that I am using to get consistent, professional results in both HDR and SDR on YouTube.
Camera Settings
The Pixel 8 Pro records HDR video using the HLG transfer function within the Rec. 2020 primaries. These settings give me the best possible source files for grading and delivery in DaVinci Resolve.
- Resolution:
4K (Ultra HD)
Choosing 3840×2160 resolution forces YouTube to use its higher-quality VP9/AV1 codec and ensures future-proofing. - Frame Rate:
30
I match motion to 30 fps because many phones either disable HDR or reduce bit depth at 60 fps. 30 fps is the safe rate for guaranteed 10-bit HLG. - 10-Bit HDR:
HDR
Ensure “HDR” or “10-bit HDR” mode is enabled in the camera settings.
To check if a video file was shot in HDR you can look at the file's metadata by right-clicking and viewing the file information. It typically includes:
Dimensions: 4K (3840 × 2160)
Frame rate: 30fps
HDR: On
Codec: HEVC Long
Color sampling: YCbCr 4:2:0 10-bit
Color Space: Rec. 2020 / HLG
These same general principles apply when using the Osmo Pocket 3 or Sony A7C II in HLG mode.
DaVinci Resolve
I wanted to learn video editing using the best possible editor. DaVinci Resolve is an incredible editor and even offers an excellent free version. Unfortunately only the paid Studio version exports the necessary 10-bit YouTube HDR file. The free version can still ingest and edit the 10-bit HLG footage, but the final H.265 export will be 8-bit which YouTube will treat as SDR (Standard Dynamic Range) despite the correct metadata tags. Unfortunately DaVinci Resolve has a habit of silently reverting back to the free version when updating. This has caused MANY of my videos to be not recognized by Youtube as HDR, but once the video is posted its too late.
Here are my HDR workflow settings:
Davinci Resolve (toolbar) → Preferences → General
- Use 10-bit precision in viewers if available:
checked
File → Project Settings → Master Settings
- Timeline Resolution:
3840×2160 Ultra HD - Timeline Frame Rate:
30 fps
Set to match your source video files, 30 fps in this case.
File → Project Settings → Color Management
- Color Science:
DaVinci YRGB Color Managed - Automatic Color Management:
unchecked - Color Processing Mode: Custom
- Input Color Space:
Rec. 2100 HLG (ARIB STD-B67) - Timeline Color Space:
DaVinci WG/Intermediate - Working Luminance:
HDR 1000 - Output Color Space:
Rec. 2100 HLG - Graphics White Level:
203nits
This setting corrects a common issue where titles and graphics look grey in an HDR timeline. Because HLG’s reference white is around ~75% signal (≈ 203 nits in a 1000 nits mastering scenario), setting this ensures white appears bright and correct.
Clip Attributes
Resolve can mis-tags the footage input color space. In the Media Pool, open the Video Clips Smart Bin. The list of video clips will the Input Color Space.
To update the Input Color Space, you can select all the video files and right-click to set the Input Color Space to Rec. 2100 HLG or Rec. 2020 HLG
Either of these will work. Rec. 2020 defines the wide color primaries (the 'container'), while Rec. 2100 is the specific ITU standard that uses these primaries and specifies the HLG transfer function. Using the Rec. 2100 HLG option in Resolve is generally the most technically correct choice.
I often include photos in my video. For still images make sure the Input Color Space is assign P3 or sRGB depending on source.
Display and Playback Notes
The HDR video in DaVinci Resolve on my MacBook screen can appear overly bright, washed out, or clipped in the editor. Don’t judge HDR by how it looks on an SDR-only screen; use an HDR display or check metadata carefully.
When you want to preview the HDR grade accurately on a MacBook, go to System Settings -> Displays and change:
Preset: `HDR Video (P3-ST 2084)`
Unfortunately although you will see the video rendered accurately with this setting, everything else will look dark on the screen. I do my editing with the Preset set to Apple XDR Display (P3-1600 nits) and change it only when I want to do a video preview.
Also note that VLC Player on macOS often displays HDR content as SDR (flat and dim) because it doesn’t correctly apply HLG tone mapping. Use QuickTime Player or Safari for reliable HDR preview when playing video clip files or exports.
Deliver Page (Export Settings)
On the Deliver Page you can simply use the H.265 Master to export your file for YouTube. I like to make a few changes and use the following settings:
- Format:
MP4 - Codec:
H.265 - Encoding Profile:
Main10 - Color Space Tag:
Rec. 2020 - Gamma Tag:
Rec. 2100 HLG - Resolution:
3840×2160 - Frame Rate:
30 fps - Audio:
AAC, 320 kbps, 48 kHz
Uploading to YouTube
Upload to YouTube just like any other video — YouTube will automatically detect the HDR metadata and eventually display an “HDR” badge in the quality menu. The SDR versions of the video process pretty quickly but be warned that the HDR version of the video can take a between 1 to 48 hours to appear.
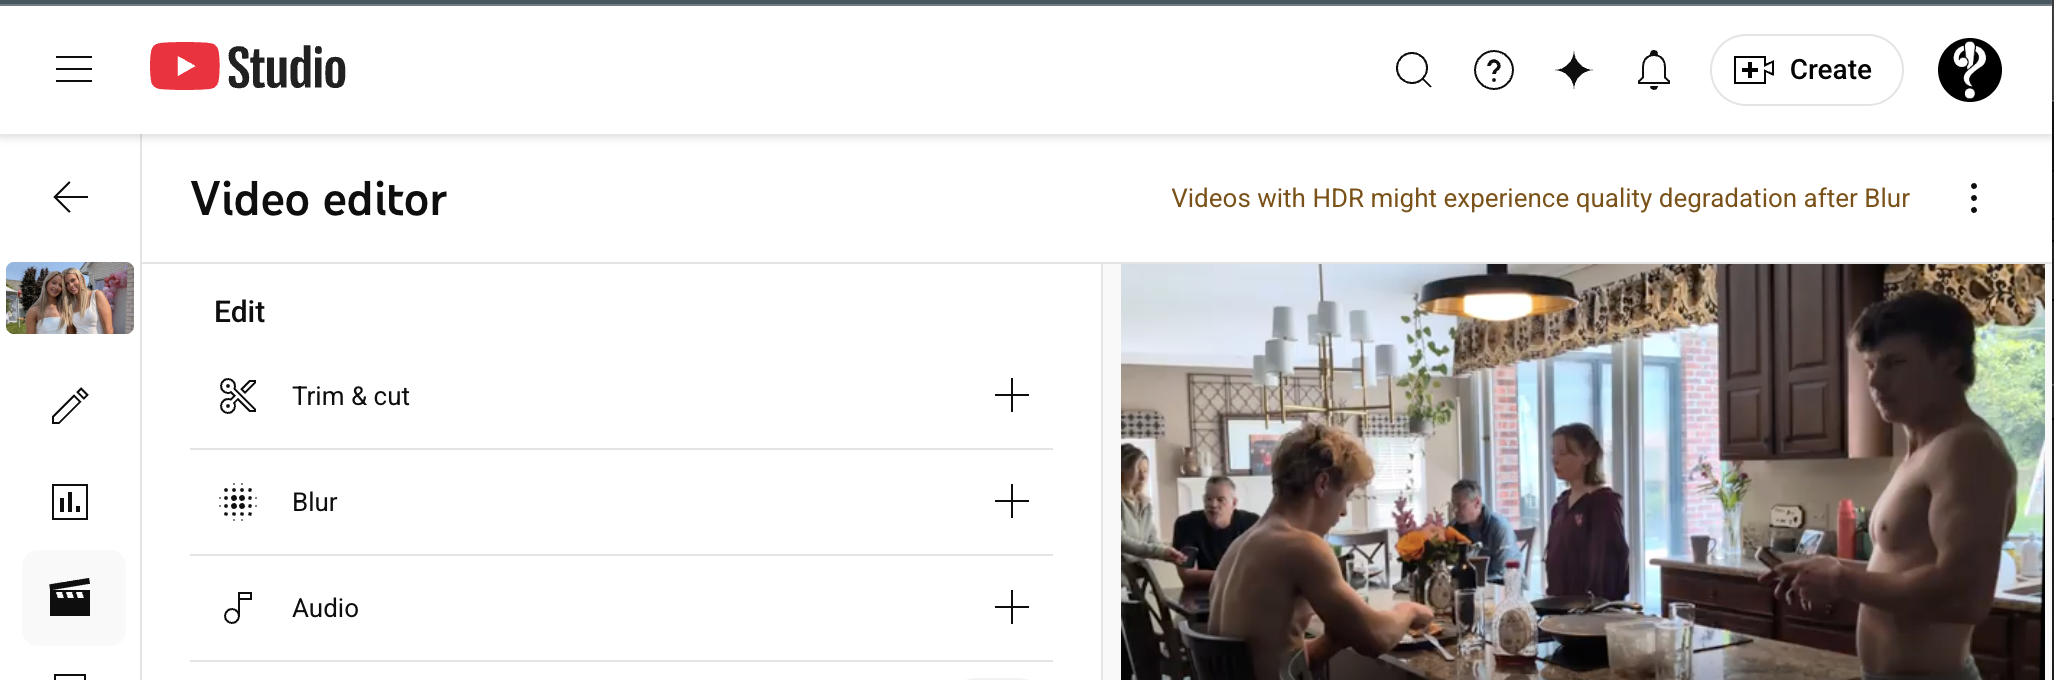
You can check if YouTube has detected that the video is HDR after uploading by checking the video's Editor screen. The screen will have the warning: "Videos with HDR might experience quality degradation after Blur" in the upper right corner. If you see this message you can be assured that its just a matter of time before YouTube processes the HDR versions of your video.
Troubleshooting Tips
Here are common issues creators face and how to fix them:
“HDR” badge not showing on YouTube
- HDR versions are still processing: It may take 12-48 hours or more for the HDR badge to appear.
- Metadata missing or incorrect: Ensure tags include Rec. 2020 primaries, Rec. 2100 HLG or PQ, matrix Rec. 2020 non-constant luminance.
- Container/codec issue: Use MP4 or MOV (QuickTime) with HEVC/H.265 Main10 10-bit or other supported codec.
- Mastered in unsupported gamut (e.g., DCI P3) but tagged as Rec. 2020: can cause over-saturation or YouTube treating as SDR.
Titles or graphics look grey or washed out
- Your Graphics White Level may be too low — set to ~203 nits for HLG so titles appear correctly white.
- Monitor/display not in HDR mode: On MacBook enable HDR display for accurate preview.
- Viewing tool doesn’t support HLG tone mapping (e.g., VLC on Mac): switch to QuickTime or HDR TV preview.
Playback appears flat, dull or colour-shifted
- Device is not HDR-capable: You’ll see a down-converted SDR version — this is expected.
- Monitor not calibrated or using wrong profile: Ensure display is set for HDR or correct colour profile is used.
- YouTube’s SDR down-conversion isn’t perfect for every shot: For critical projects consider supplying a LUT hint to YouTube’s SDR down-conversion (an advanced technique).
File too large or slow upload/processing
- HDR files are bigger — aim for efficient bitrate (~50-100 Mbps for 4K HDR) rather than extreme bitrates, to avoid long uploads and delays.
Key Takeaways
- Shoot HLG in Rec. 2020 on all HDR-capable cameras for consistent color and brightness.
- Use DaVinci Wide Gamut Intermediate as your timeline space for grading freedom.
- Set Graphics White Level to ~203 nits so titles and graphics appear bright and correct in HDR.
- Export H.265 (Main10, 10-bit) tagged with Rec. 2100 HLG for YouTube HDR delivery.
- Metadata completeness matters — YouTube auto-detects HDR via tags; there’s no manual “HDR” toggle.
- Fixing metadata, container, bit-depth and color space issues upfront solves most headaches.
If you follow how your camera’s HDR signal flows through DaVinci Resolve and out to YouTube, you’ll avoid common pitfalls like greyed-out titles, muted highlights, or incorrect color space tagging. Once set up, your HDR workflow will feel no more complicated than SDR — except your videos will simply look dramatically better on modern HDR displays.


Comments ()